
|
| Protecting Azure API Management APIs with Cloudmersive Virus Scanning |
| 11/10/2026 - Brian O'Neill |
OverviewAzure API Management (APIM) sits in front of your APIs and gives you one place to apply policies to every API request. In this article, we’ll show you how to use APIM’s policy capabilities to add malware protection to an existing APIM API with Cloudmersive virus scanning. With Cloudmersive protection, every file upload sent to your API is scanned, and unsafe uploads are blocked before they reach your backend. This configuration is broken down into two distinct parts:
This article walks through both parts, one step at a time, with screenshots to help you clearly visualize the process. Please note that this article assumes you already have the following in place:
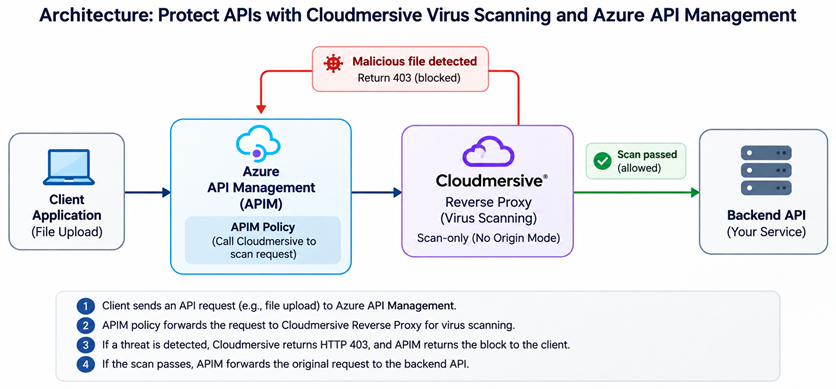
This article does not cover creating an APIM instance or an API. How it worksIn Figure 1, you’ll find a diagram showing how a request moves through the setup. A client sends a request (such as a file upload) to your API in APIM. The policy you’ll add forwards a copy of the request to your Cloudmersive Reverse Proxy Server. If the scan finds a problem, the Reverse Proxy Server answers with your specified HTTP error code, and APIM returns that response to the client. If the scan passes, APIM carries on as usual and sends the request to your backend.
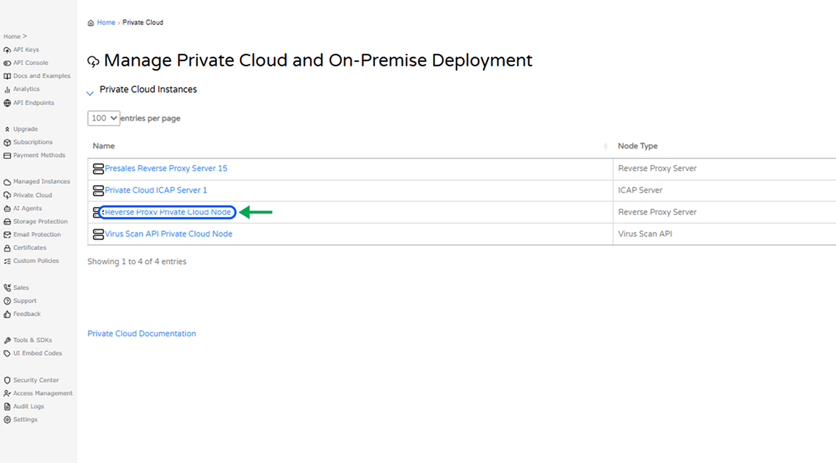
Please note that in this demo setup, the Reverse Proxy Server runs in scan-only mode with no upstream proxy. It only enforces policies on the incoming request. You achieve that by giving it a Null Target, which means it has no server to forward to; your backend only ever receives requests from APIM. Cloudmersive offers scanning policies for all the most common ways files are sent to an API: multipart/form-data file uploads, JSON requests with binary data, and raw binary POST bodies. This article configures only the multipart/form-data policy, but the other two options are set up the same way. PrerequisitesBefore you begin following along with this walkthrough, please make sure you have an Azure API Management instance with an API that accepts uploads. You also need a Cloudmersive Reverse Proxy Server node (if not deployed, contact your sales representative for deployment details). Reverse Proxy Server nodes can run on Cloudmersive infrastructure through a Managed Instance, or on your own infrastructure through Cloudmersive Private Cloud, including on Azure virtual machines, Azure Kubernetes Service, or Azure App Service. You also need a Cloudmersive API key and the API endpoint it should use, and a network path from APIM to your node, so that APIM can send requests to it. Part 1: Configure the Cloudmersive Reverse Proxy ServerOpen your nodeFirst, sign in to the Cloudmersive Management Portal, select Private Cloud, and open your Reverse Proxy node from the list (Figure 2).
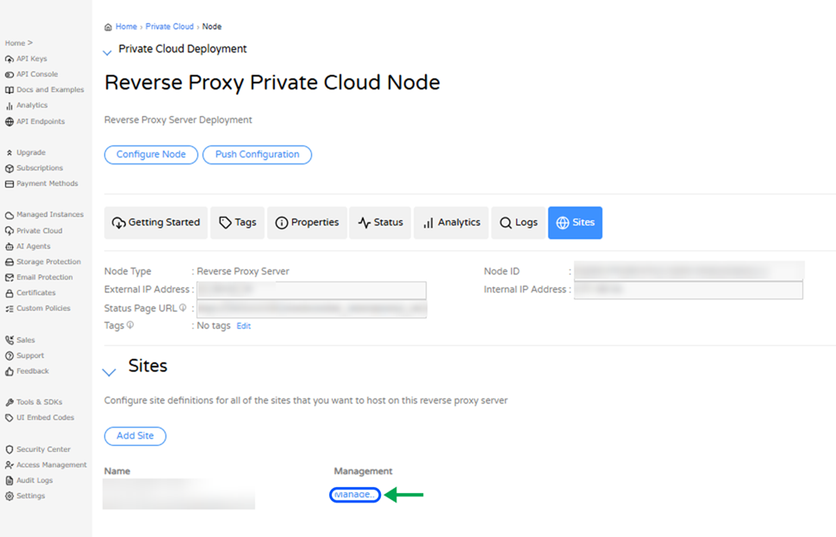
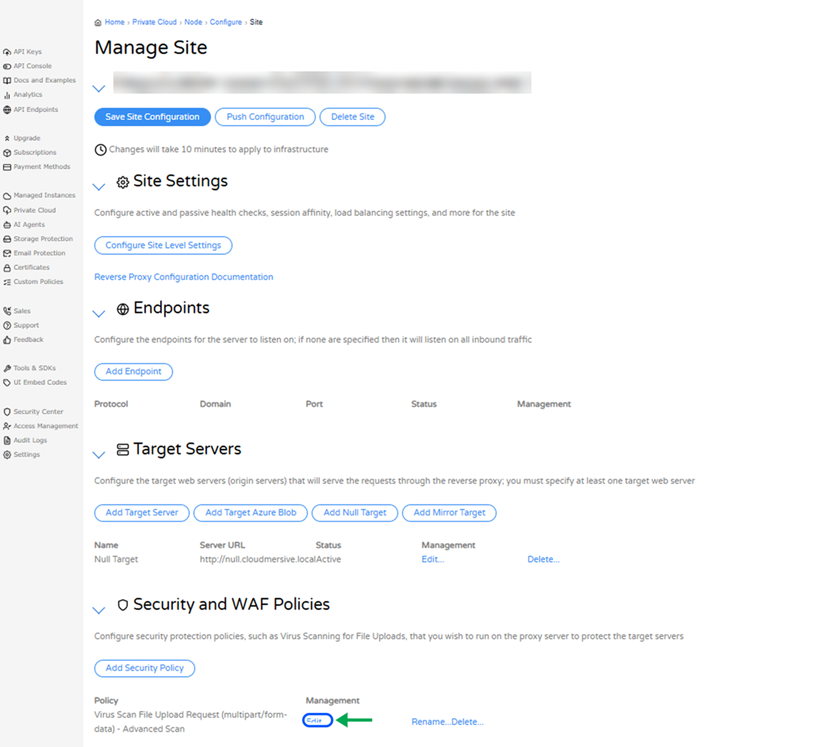
On the node’s page, open the Sites tab. Select Manage… next to the site you want to use for scanning (Figure 3). If the node has no site yet, select Add Site and give it a name. Add the Virus Scan policyOn the Manage Site page, scroll to Security and WAF Policies. From here, select Add Security Policy, and choose Virus Scan File Upload Request (multipart/form-data) – Advanced Scan (note that Advanced Scan incorporates Cloudmersive 360-Degree Content Verification in addition to signature-based virus scanning). The policy then appears in the list (Figure 4). To scan JSON or raw uploads instead, choose the matching Advanced Scan policy.
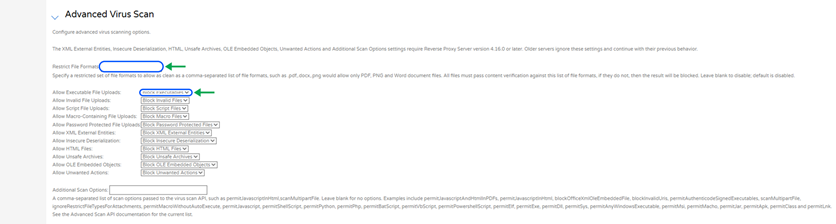
Review the Scan SettingsNext, select Edit…, which you’ll find next to the policy to open the Advanced Virus Scan settings (Figure 5). These settings control what the scan blocks. Every Allow option defaults to blocking, covering executables, invalid files, scripts, macro-containing files, password-protected files, XML external entities, insecure deserialization, HTML files, unsafe archives, OLE embedded objects, and unwanted actions. Note that some of these settings require Reverse Proxy Server 4.16.0 or later.
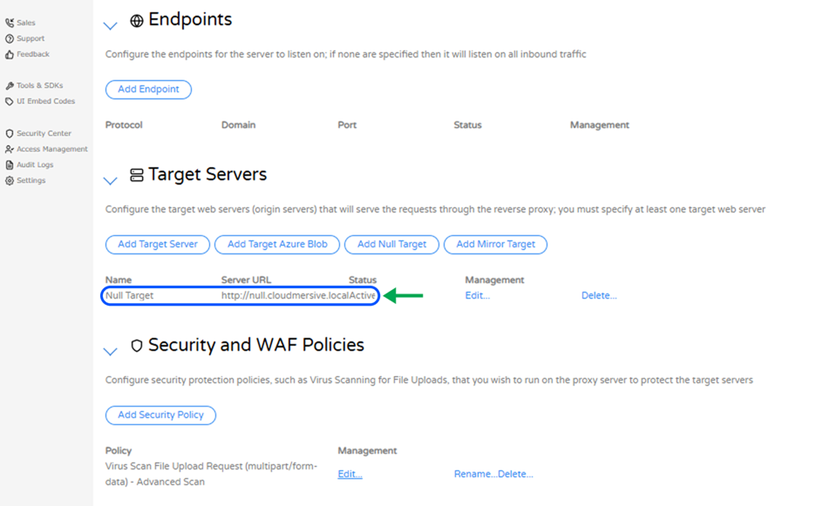
Restrict File Formats works differently than the other settings. Leave this empty to allow any file type that passes the checks we’ve outlined above. If you enter one or more file extensions here (e.g., Set the Null TargetNow scroll to Target Servers and select Add Null Target, then select Add Null Target again on the following page to confirm. Your entry then appears in the list as Null Target (Figure 6). Because the node has no real target, it only scans requests and returns the result – which is exactly what APIM needs.
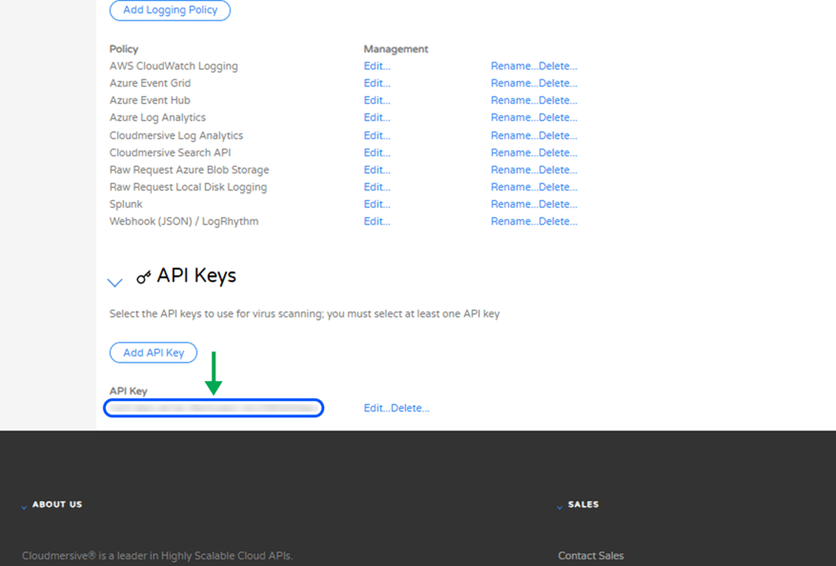
Add your API keyNext scroll to API Keys at the bottom of the Manage Site page and select Add API Key. Enter your Cloudmersive API key, and then the full qualified URL of your Cloudmersive Private Cloud Virus Scan API server (if you use one; you can also use a Managed Instance or the Cloudmersive public cloud). If you add more than one key, the node will spread requests across them. Figure 7 shows a key added.
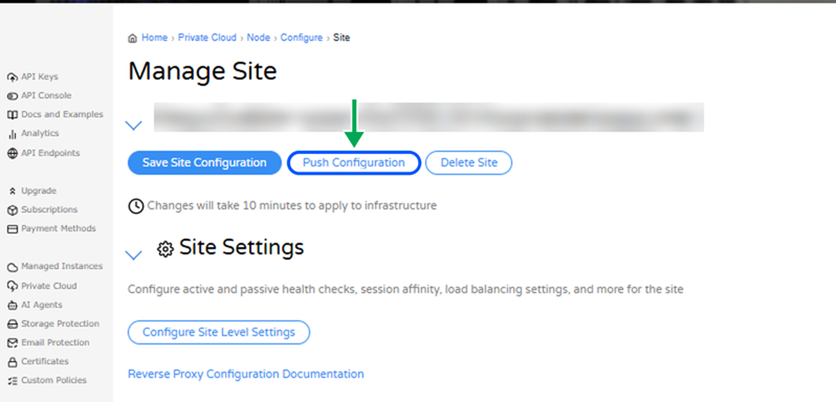
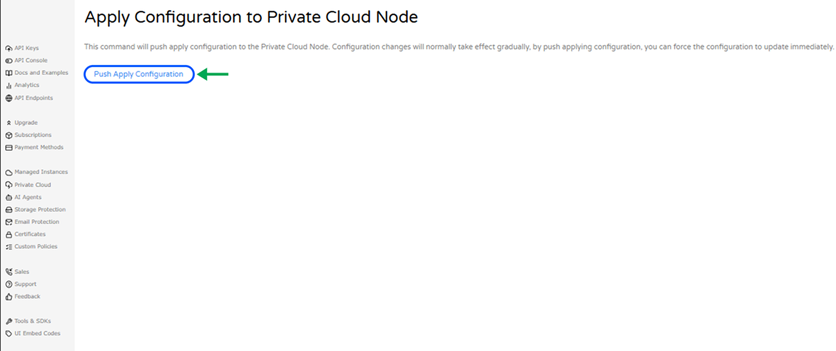
Apply the configurationNow that the configuration is complete, select Save Site Configuration at the top of the Manage Site page, or alternatively select Push Configuration (Figure 8). Note that changes may take up to 10 minutes to apply. If you opt for Push Configuration, the following Push Apply Configuration page (Figure 9) lets you force the update to apply immediately.
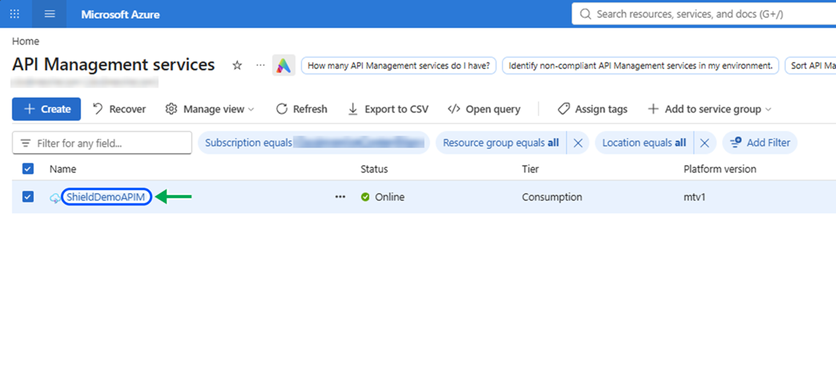
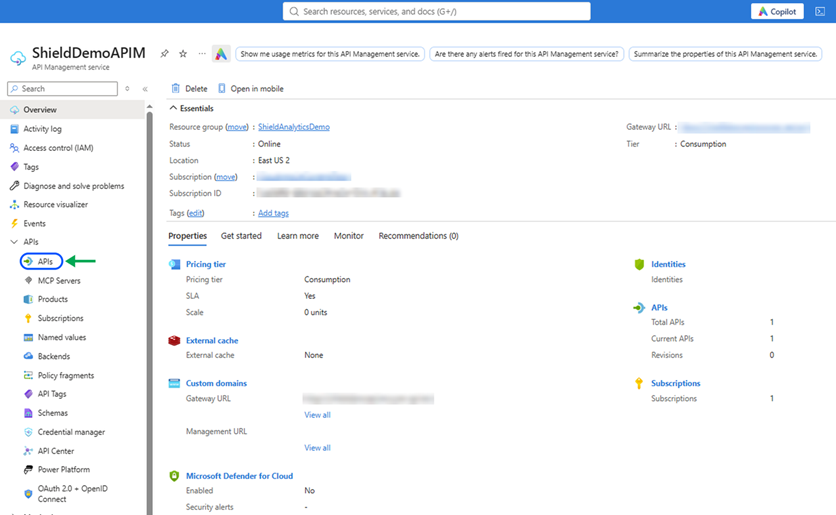
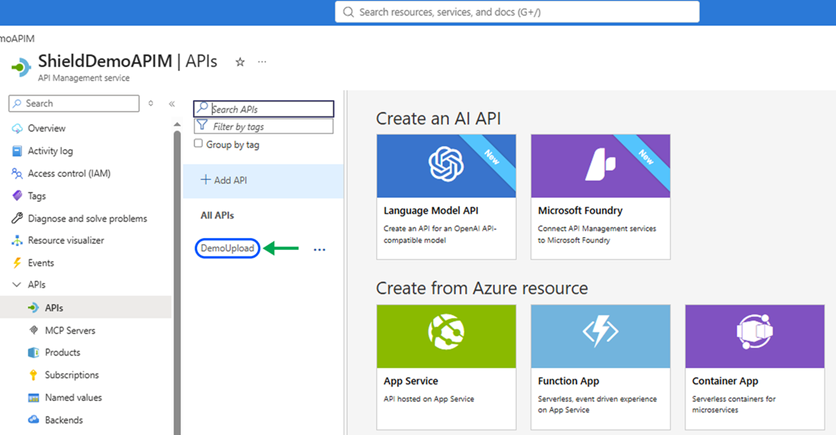
Make the node reachable from APIMThe policy provided in Part 2 of this article sends requests to your node’s address, so the node must accept inbound HTTP or HTTPS traffic from APIM. Check the firewall or network security group in front of your node to confirm. Part 2: Configure Azure API ManagementFind your API in APIMIn the Azure portal, navigate to API Management service and select the instance you’d like to use (Figures 10 and 11). Then select APIs and choose the API you’d like to protect (Figure 12).
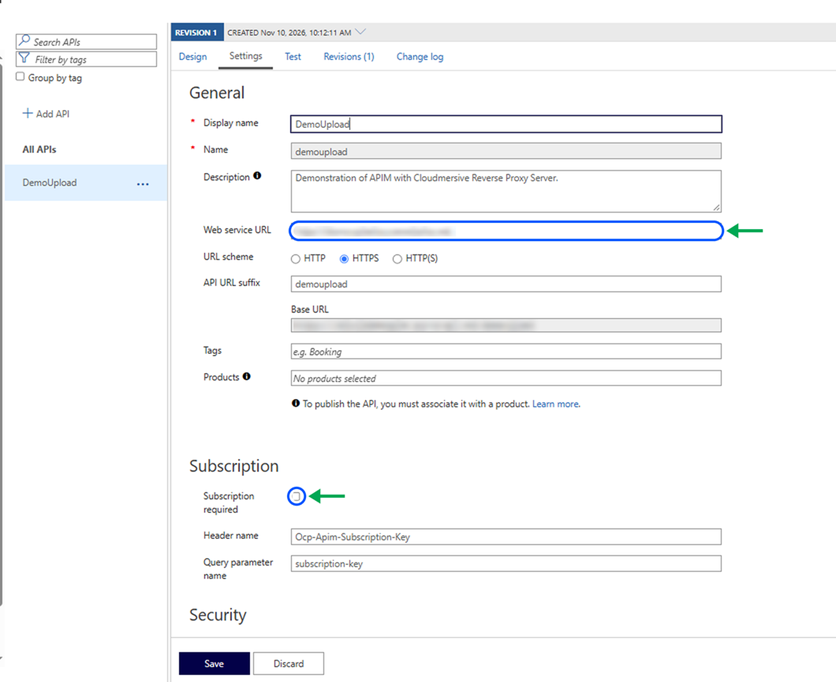
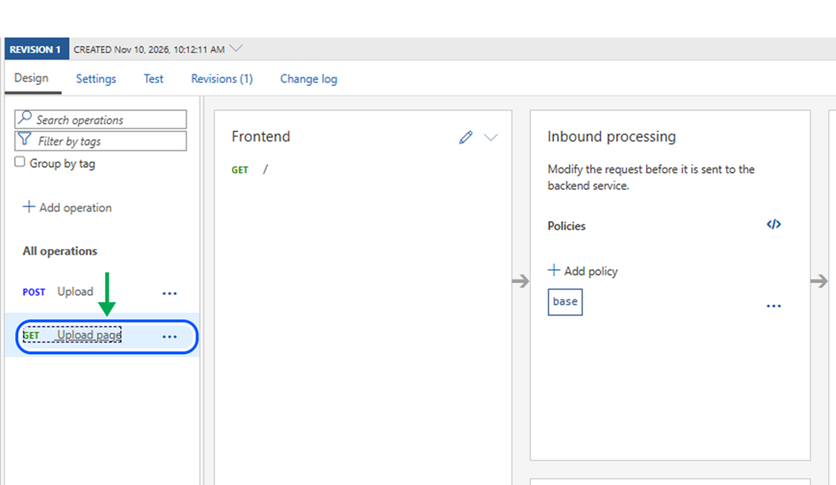
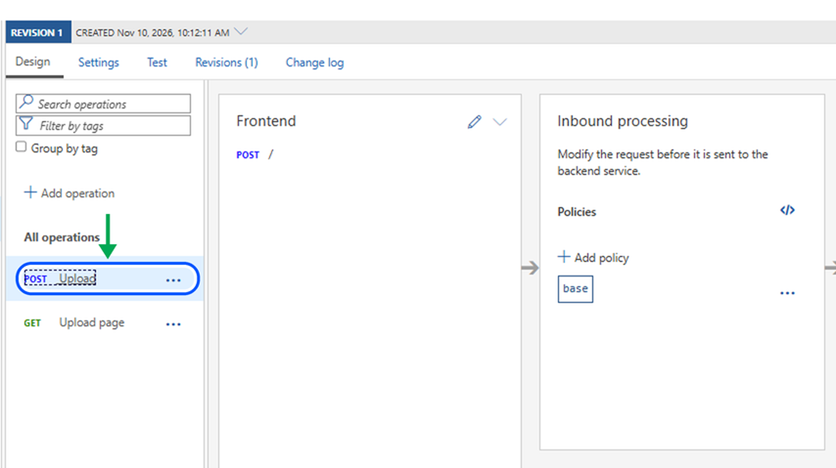
About our example APIPlease note that the screenshots in this section use a small example API called DemoUpload*, which forwards to a demo file upload app we use internally at Cloudmersive. Its Settings tab shows the backend’s Web service URL, the URL scheme, and the API URL suffix (Figure 13). It has two operations: a GET for the upload page (Figure 14) and a POST for the upload itself (Figure 15). Your own API will obviously have different names and operations; the steps that follow work the same way for your APIM APIs.
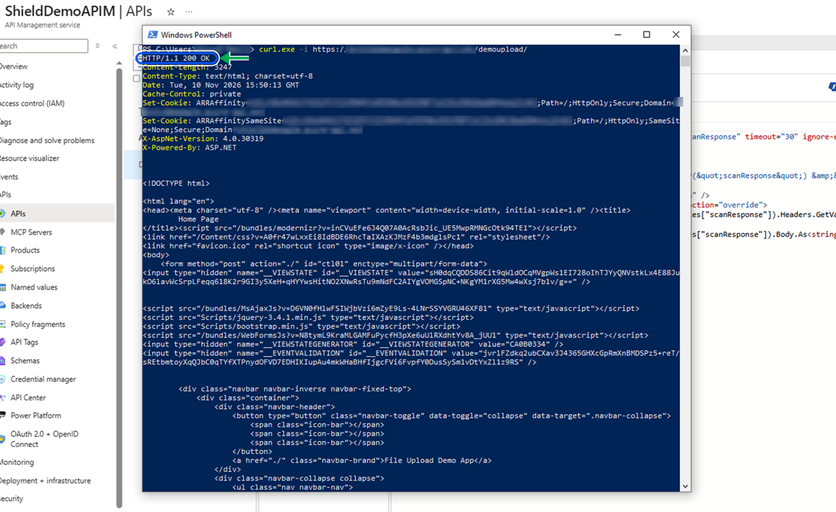
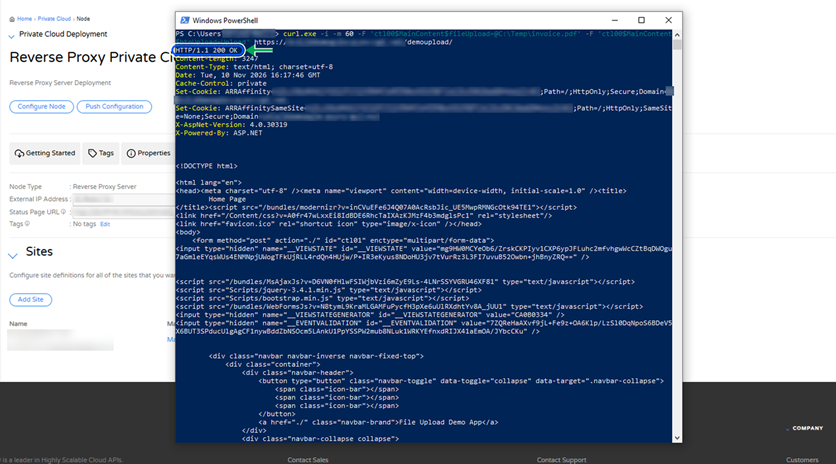
Additionally, note that Subscription required is turned off in our example settings (Figure 13), so no key is needed to call it. If your API request a subscription key, make sure to add the Test before adding protectionBefore adding the policy to your API, we recommend first sending a request to confirm that APIM reaches your backend. Testing first means that if something fails later, you know the policy is the cause. In PowerShell, run
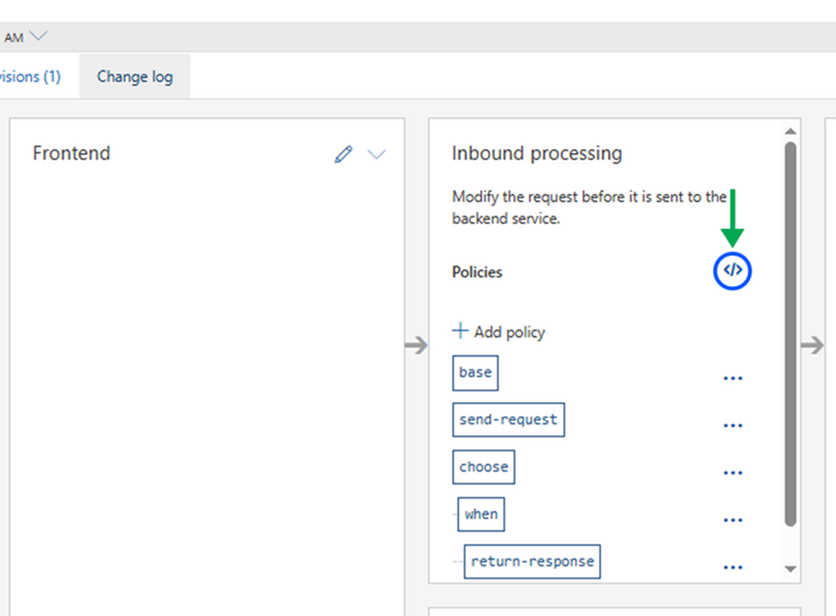
Add the policyIn your API, open the Design tab and select All operations. Under Inbound processing, select the
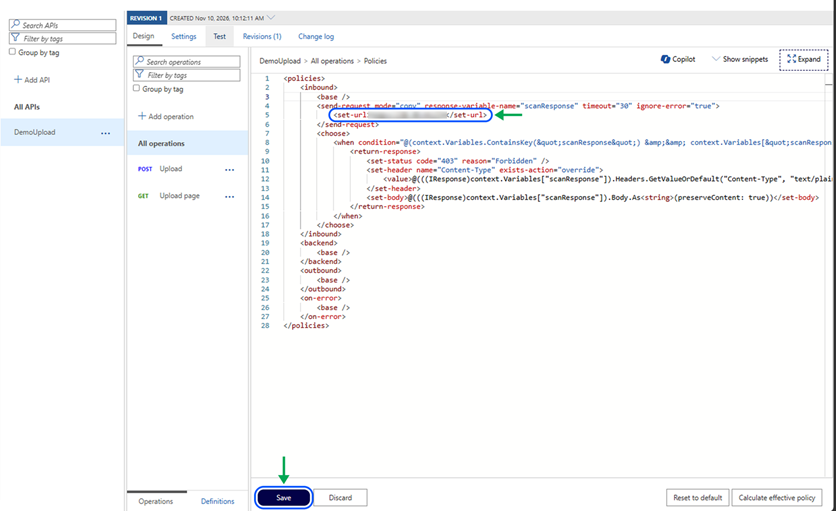
Replace the contents of the editor with the policy provided in this article (you’ll find this at the bottom of the page). Then change the address in the
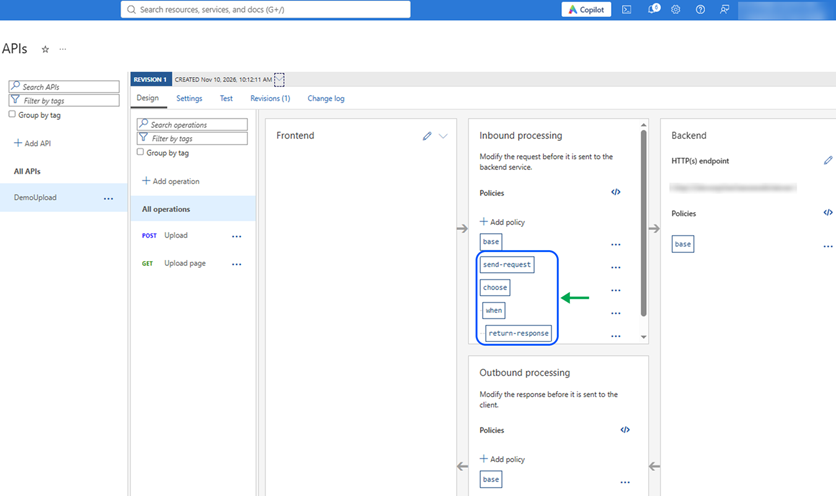
Understanding what the policy doesThe policy you applied has two distinct jobs. The
Part 3: Test the ProtectionWe recommend testing your policy with both clean and “unsafe” files to confirm protection is active. In this section, we’ll explain how to run two quick tests via PowerShell. Prepare your test filesBefore testing, we recommend copying two test files to a short, simple folder. The reason for this is that long paths, spaces, and cloud-synced folders (such as OneDrive) can make curl commands fail; a temporary folder alleviates those issues. Testing should be as clean and controlled as possible. For the “safe” file test, we recommend using any normal file you have (such as a PDF or image), and for the “unsafe” file test, we recommend using an EICAR test file. If you’re unfamiliar with EICAR test files, please note that they are not live threats. They are 68-byte files made to imitate threats so that antivirus software can show threat detection. The official source is In PowerShell, create the temporary folder with the following command:
Copy your safe file using the below command, replacing
Next, download the EICAR file using the following command: As you may be aware, Microsoft Defender Antivirus treats EICAR test files as malware, so it may delete the file as soon as it’s saved in the folder. If that happens, open Windows Security, go to Virus & threat protection, then Manage settings, and remove the exclusion when you finish testing. If your organization manages your antivirus, we recommend asking your IT team, or running the test from another computer. Once complete, run Send a clean fileNow upload the safe file using the following command:
Replace
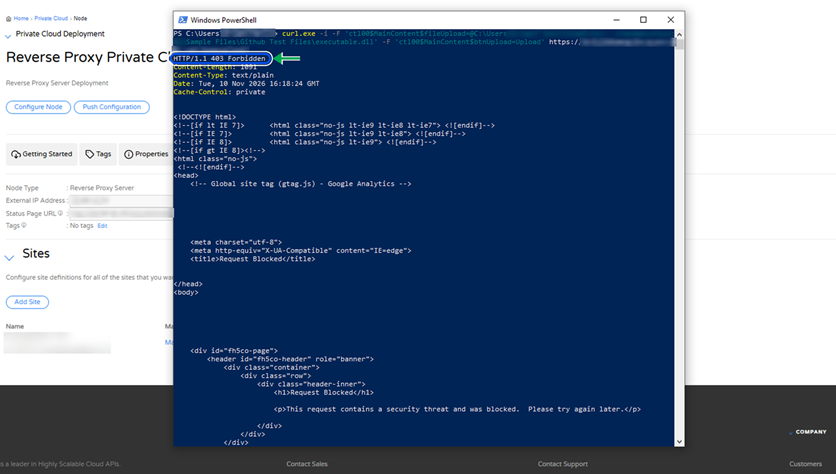
Send an unsafe fileNow upload the EICAR file the same way, with:
The response should be your custom forbidden error code (403 in this example) with a Request Blocked page (Figure 22). This means the Reverse Proxy Server blocked the upload, and the policy passed that answer back to the client, to the file never reached your backend. Note that we used an executable file (a
Behavior and OptionsIf the node can’t be reachedThe policy sets Changing what’s blockedThe allow and block options and Restrict File Formats on the scan policy decide what returns a forbidden error code. Remember that changes take about 10 minutes to apply once pushed. The blocked responseThe Request Blocked message is the same for every block, whether the cause is a virus, an executable, or a file type rule. In our example test, the response came back with a content type of Policy to PastePaste this policy in your API policy configuration: Learn MoreTo learn more, see our knowledge base article on protecting Azure API Management APIs and the Virus Scan API reference. To learn more about Cloudmersive Reverse Proxy Server, please contact your sales representative. |
Sign Up Now or 

 Technical Articles
 Virus Scan APIs
 Content Disarm and Reconstruction APIs
 Spam Detection APIs
 Document Conversion & Processing APIs
 Document AI APIs
 Natural Language Processing (NLP) APIs
 Optical Character Recognition (OCR) APIs
 Image and Face Recognition and Processing APIs